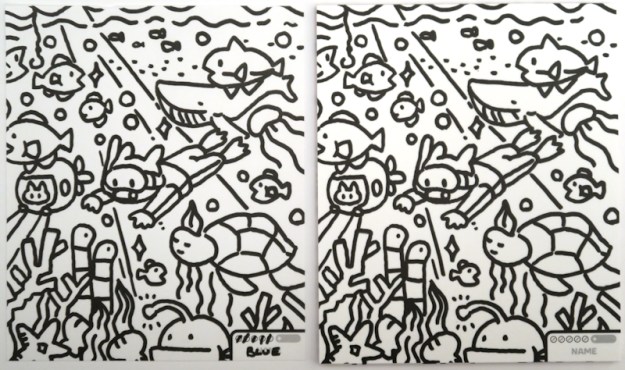
The evening started with everyone unsure who was coming, so the nine players present split into three groups of three, with Blue, Pine and Lime starting with the “Feature Game“. This was the very short, light, Make the Difference, a game that is basically “spot-the-difference” in board game form. The idea is that each player gets a pre-printed picture and simultaneously add five extra “features” to their pictures. Once everyone has added their “extras”, players take it in turns to place their pictures in the centre of the table (covered with a sheet of acetate to make it a little more difficult to spot the difference between printing and drawing), together with an unadulterated copy.
 |
| – Image by boardGOATS |
Players have one minute (timed with a slightly grumpy egg-timer), during which a player spotting an addition gets a point, then a second minute, during which both the spotter and the modifier get a point. After the two minutes, any un-spotted additions are assessed for size, and if they are large enough, the modifier gets two or three points. The additions have to be a single line, may extend an existing feature, and can’t just increase the width of an existing line. This time, Pine went first with his picture, and the slightly mardy timer gave Lime and Blue a few extra seconds to spot his additions as Pine encouraged it to behave. Most of his additions were spotted, partly as a result.
 |
| – Image by boardGOATS |
Lime went next, and players were slower to spot his additions giving him extra points. Blue was the last, but this time Pine and Lime really struggled. For some reason, Blue seemed to be better hiding hiding her additions, taking six points for lines that weren’t spotted during the two minutes of play. In contrast, her poor spotting let her down, giving her a total of eight points, and just enough for second place. The winner was Lime, however, with ten points. There was a little chatter while they packed away, but as there were no new arrivals, the trio moved on to play something else, and quickly chose to give the recent Northern Lights edition of Ticket to Ride another outing.
 |
| – Image by boardGOATS |
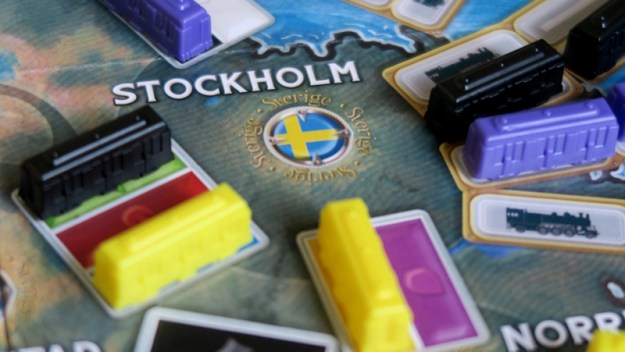
Ticket to Ride: Northern Lights has had a couple of outings since it’s group debut last summer, and has been quite popular in the group. The game is a fairly standard edition of Ticket to Ride (take cards from the market, or play cards to place trains), but the map is set around the Scandinavian countries of Denmark, Norway, Sweden and Finland. Like all the variant games, this one has a couple of minor rules tweaks, principally, the addition of bonus cards which give points at the end of the game and bonuses for completing some of the longer Ferry routes. Locomotives are also handled slightly differently as the market is not refreshed when saturated by them, and for Ferry routes only, they can be replaced by any two cards of the same colour.
 |
| – Image by boardGOATS |
This time, the bonus cards drawn at random were the Locomotive Collector (A), International Tycoon (G), Polar Express (H) and the Ferry Master (J). Pine went first and started placing trains much to Lime and Blue’s horror. A few turns later, Lime headed up the Norwegian cost, while Blue started building an extended route from Bergen in the west through Stockholm to Tallin in the east. It was then that Pine, with his north-south route got in her way and began costing her points thanks to the fact that with only three players the double routes weren’t in play.
 |
| – Image by boardGOATS |
As he had done last time the group played, Lime churned through his trains remarkably quickly catching Pine and Blue on the hop slightly. After the last few turns had been played, the bonus points were allocated with each player winning one (Lime for the most Ferry routes; Pine for the most tickets ending in the Arctic Circle and Blue connecting the most countries while nobody had any Locomotive cards at the end of the game). Pine claimed a completed Ticket for eighteen points which he had almost completed when he drew it (AGAIN!). Also like time, Lime finished with a nice round hundred points, and once again was pipped pipped to victory by Pine, albeit by a larger margin (ten points rather than three).
 |
| – Image by boardGOATS |
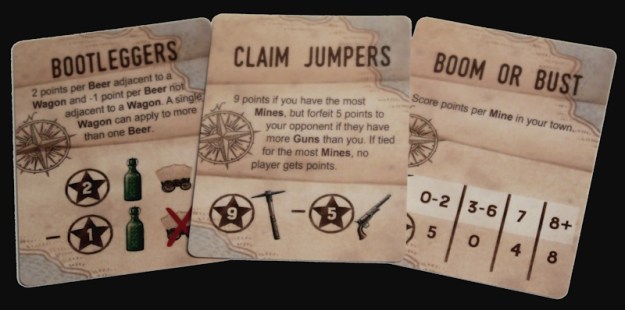
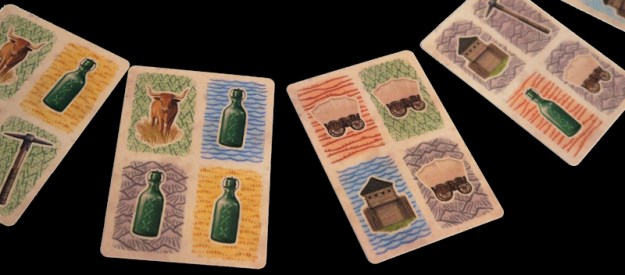
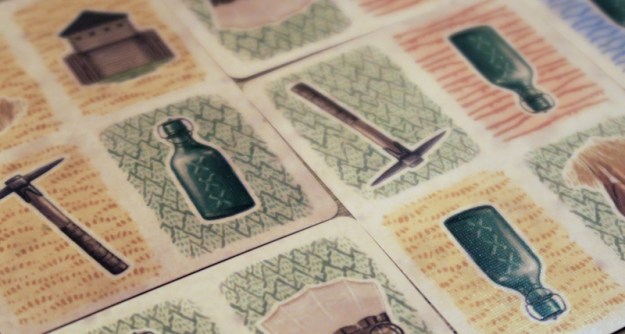
With that over, Lime headed home, leaving Blue and Pine to kill time while waiting for one of the other games to finish. In this, they played a little “wallet game” called Circle the Wagons. This is a simple, quick game where players take cards from a market and add them to their player area, building a map, scoring points according to the largest areas of each terrain type and three addition scoring criteria selected at random. These scoring criteria are printed on the reverse of the cards and are drawn at random at the start of the game. The first bonus card drawn was “Boom or Bust which gives points for two or fewer Mines/Pickaxes, none for three to six and four or five points for seven or eight (or more).
 |
| – Image by boardGOATS |
The other bonus cards were Claim Jumpers which gives the player with the most Mines/Pickaxes nine points (though they lose five if their opponent as more Guns), and Bootleggers which give two points for each Beer Bottles next to a Wagon (and minus one for any not next to a Wagon). Once the bonus cards had been picked, the remaining fifteen cards were shuffled and arranged in a circle. The first player, in this case Pine, could then choose to either take the first card, or take another, later card, leaving any that had been skipped for his opponent, Blue, who then had the same choice. Play continues until all the cards had been taken.
 |
| – Image by boardGOATS |
This time, Pine started prioritising Pickaxes, given the fact that two of the bonus points scored for them. Blue was slow to get started with these and ultimately scored nothing for Boom and Bust and for Claim Jumpers. She collected Beer Bottles instead and prioritised scoring for her terrain. Blue’s thirteen points for Beer Bottles exactly matched Pine’s for his Pickaxes, though he picked up half a dozen points for his Beer as well. Blue took six points for her Forest and four for her Plains, while Pine got five points for each of his Desert and Water terrain. It was closer than it seemed during the game, however, with Pine finishing with thirty-five points, just three more than Blue.
 |
| – Image by boardGOATS |
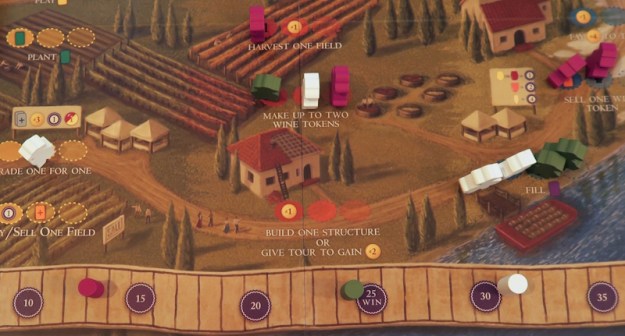
By this time, Pink, Teal and Ivory were bringing Viticulture to a close. This is one of the group’s most popular worker-placement games and a particular favourite amongst Pink and Teal who have been promising each other a game for months. The game is quite simple and doesn’t really do anything fancy, it just does what it does very well. The idea is that players are making wine, which they do by placing their workers on spaces on the central board. Each space has a limit to how many workers can occupy it, with each player having a “Grande” worker who can muscle in anywhere. This time, the group played with the Tuscany expansion, which adds a few little extras.
 |
| – Image by boardGOATS |
Firstly, whereas the base game has essentially two seasons spring and autumn (with visitors in summer and winter), the Tuscany expansion has actions for all four seasons. Players can also build special buildings (which give additional powers and special options for those that make the effort to build them), and claim regions to gain influence (and bonuses) which scores points at the end of the game. The player order works slightly differently to the base game and the end of the game is triggered when someone passes twenty-five points (rather than twenty in the original game). This time, however, nobody took advantage of the opportunity that Tuscany provides to build buildings, instead focusing on the basics of planting grapes and harvesting them.
 |
| – Image by boardGOATS |
There is a now a well-known and frequently used tactic of selling a field at the start of the game to provide equity in the early part of the game. Teal and Ivory both went down this route while Pink decided to try something else, but that didn’t go well for him. His problems were exacerbated by his inability to get access to fulfilling orders later in the game. Ivory started acquiring points early taking an early lead. Teal wasn’t far behind, but never quite managed to overhaul Ivory who triggered the end of the game and finished with thirty-one points, seven more than Teal in second place.
 |
| – Image by boardGOATS |
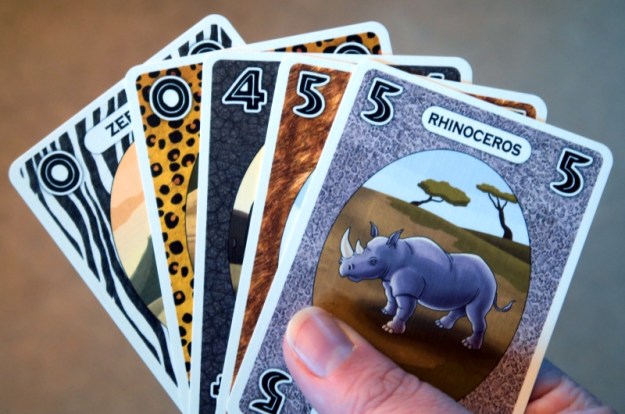
When Viticulture finished, Ivory and Teal headed home, leaving Pink to join Blue and and Pine in a couple of quick games of Botswana. This is a sort of simple stock-holding game where players are collecting animals. The idea is that there are five suits of animal cards, each numbered from zero to five—these are shuffled and dealt out to the players with a small number left out for ambiguity. Matching the suits, there are five sets of five plastic animals. Players take it in turns to play a card (any card) and then take an animal (any animal) until someone plays the sixth card in any suit.
 |
| – Image by boardGOATS |
When the last card is played in any suit, the game ends immediately and players score points for their animals with each animal being worth the face value of the last card played in that suit. Thus, Zebras might have been worth five points each, right up until the last card was played which could be a zero, rendering them totally, point-less. Somehow, it is a hard game to understand—far from random, a bit like 6 Nimmt!, it is very hard to control and manipulate the scoring in a particular direction. This was quite evident in the two rounds played this time.
 |
| – Image by boardGOATS |
In the first round, Blue held a few key Elephant cards and was able to manipulate the game end to ensure they scored well. With a couple of high scoring Lions added to her menagerie, she ended the game, ensuring she finished with thirty-five points. It was very tight between Pink and Pine, but Pink just edged second place with twenty-two. The second round was also close with just two points between Pink and Pine, but this time they were vying for victory. In the end it was Pink again, this time triggering the end of the game allowing him to ensure his Leopards scored well.
 |
| – Image by boardGOATS |
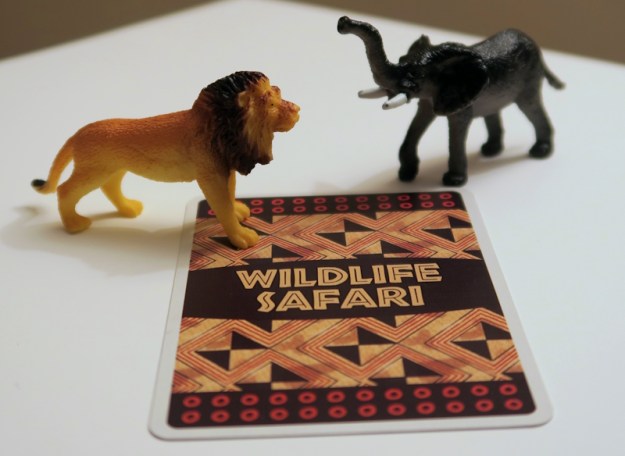
Botswana is a lot of fun and as they packed up, there was quite a bit of chatter. Pine pointed out that the backs of the cards said “Wildlife Safari” and wondered why. Blue commented that there were lots of different versions, but couldn’t remember the differences. A little bit of research shows that the game was originally released as “Flinke Pinke” and then “Quandary” and eventually “Loco!”, all with simple colour suits. Then, in 2010, the boring colour suits were changed for animals by Eagle-Gryphon Games, who initially republished the game as “Botswana”, before increasing the size of the box and calling it “Wildlife Safari”. Presumably this particular copy was released when small boxes were still available, but the company had run out of matching cards…
 |
| – Image by boardGOATS |
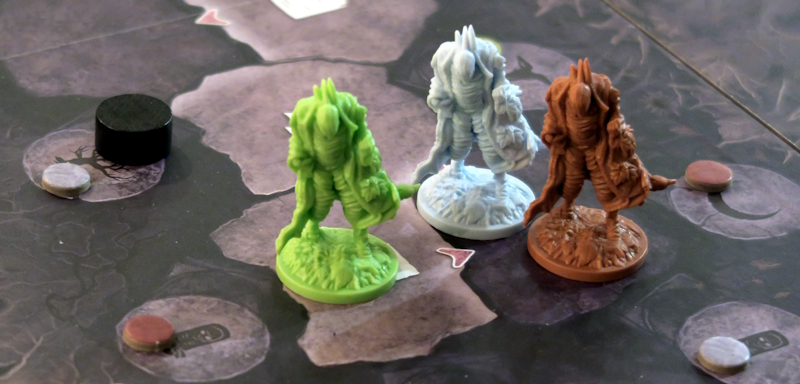
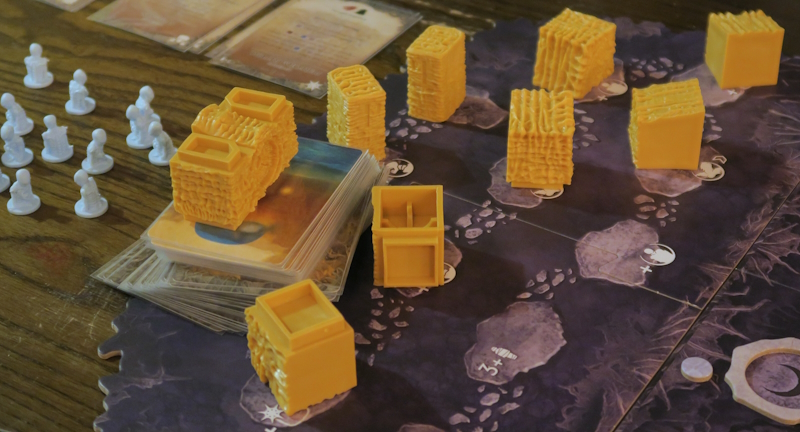
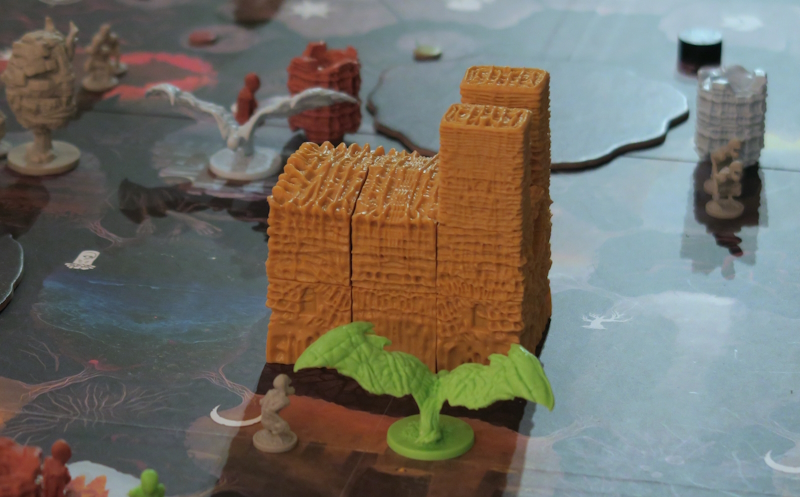
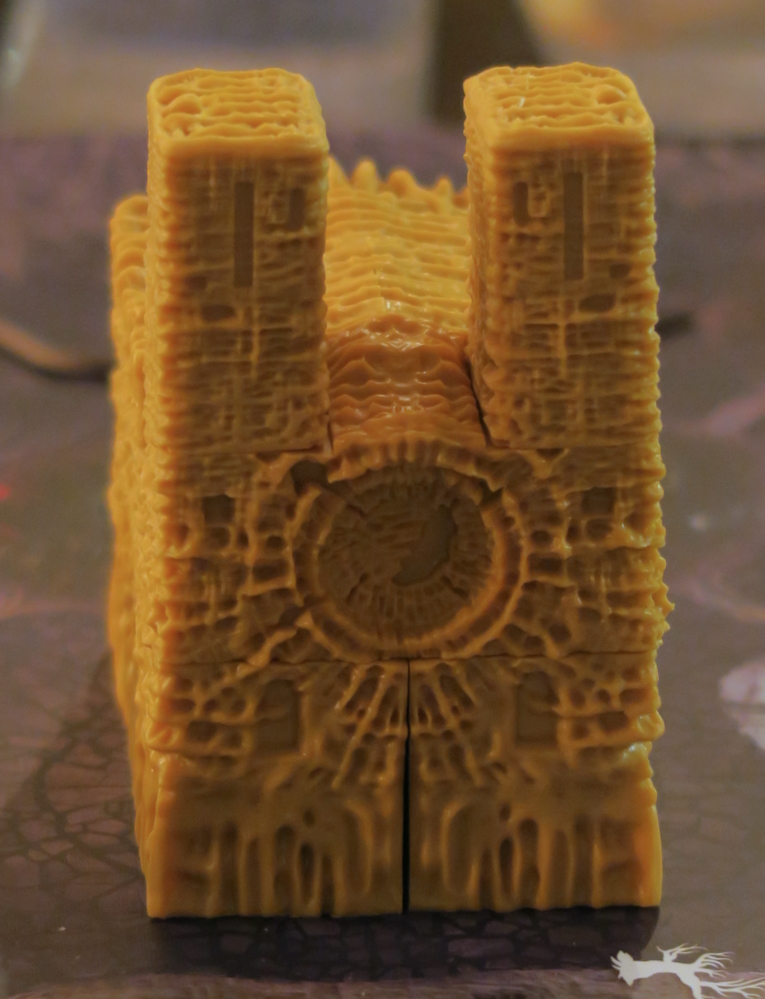
Meanwhile, on the next table, Cobalt had persuaded Plum and Byzantium to join him playing the rather epic-looking Nightmare Cathedral. This is a card-driven action-selection area-control game set in the fantasy world of late Polish surrealist painter and sculptor Zdzisław Beksiński. The game is adorned with his artwork and beautifully sculpted miniatures. Players control Units, which act as a resource, whilst an imposing Cathedral is built in the centre of the board. Once the Cathedral is completed, two Nightmares (out of a selection of eight) appear next to the Cathedral and can be controlled by a player on their turn if a certain condition is met. Each Nightmare, represented by a unique sculpt, has varying abilities such as converting or devouring units as they move around the map.
 |
| – Image by boardGOATS |
The game ends when a certain number of Units have been devoured, or, less likely, after completing three rounds. The winner is determined by points, which can be obtained from climbing the Ritual track, building Forts, Devouring the most Units, or completing objectives on Dream cards (the latter being the largest source of points). On a their turn, the active player selects an action with their Dreamer from one of five on the day/night action track, although they cannot select an action adjacent to their dreamer’s current space. After performing the action, other players get to follow, either Conforming or Dissenting depending on whether their dreamer is adjacent to the current action space.
 |
| – Image by boardGOATS |
The active player then moves their Dreamer to the adjacent Night space, a section of the Cathedral is built, the turn marker moves to the subsequent space and the next player takes their turn. Each player starts with a tableau of five cards, one for each action type, that details how each action can be performed, as well as the Conform/Dissent actions. The players also have a hand of cards, which come in two forms: action Upgrades or one-time Effects; each card also contains combat symbols. The five basic actions are: Ritual (spending/removing followers to move up the Ritual track); Summon (producing Followers); Fortify (spending Followers to Build/Upgrade Forts); Manoeuvre (moving Units and/or Shaper, performing a conversion and then initial Conflicts); Develop (playing Development cards from hand, either to Upgrade actions or gain one-time benefits).
 |
| – Image by boardGOATS |
A player controls an area if they have a Fort present, or if there is no Fort and they have the most Units in the area. The board is also populated with a “neutral” player, called The Shadows, that can participate in conflicts and be Devoured for benefits. Each area is associated with one of four symbols, with the active symbol being determined by the turn marker (which changes every turn, cycling through each symbol). Certain actions refer to these symbols, for example when moving up the Ritual track, players must spend Units from areas matching the symbol on the next level of the track, or areas marked active by the turn marker produce if that action is selected. When producing Units by marked areas, the unit is produced by the player who controls the area, not by the active player.
 |
| – Image by boardGOATS |
A player may forgo the action on the card to draw two Development cards to hand. Each player may have up to two Dream (objective) cards at any time, and may complete them on their or another player’s turn provided they match the criteria at the appropriate time as specified on the objective card. However, they may only draw new cards at a specific point in their turn from a display. Once the Cathedral is nearly complete, the Level II Development and Dream cards are mixed in with the initial Level I cards to provide enhanced benefits and more points. When a player initiates Conflicts, they get to choose which of the valid areas the Conflict(s) occur, and they do not need to participate in the conflict themselves.
 |
| – Image by boardGOATS |
To resolve a Conflict, the two players involved reveal a number of Development cards from hand—the number determined by the number of units present in the Conflict area (plus one if they also have a Fort). Each card depicts claws and shields: a Unit is removed for each claw that was not deflected by a shield. The winner of the Conflict is the player who has a Fort remaining, or, failing that, the most Units in the area; the looser must retreat all remaining Units to adjacent areas. Each player starts with one action upgraded, drawn at random—each player drew an upgraded summons card.
 |
| – Image by boardGOATS |
Cobalt played first, and was able to complete one of his Dream cards immediately. In the first few turns, Byzantium managed to pin Cobalt in one corner of the board, which severely limited his ability to expand and produce Units, whereas Plum was able to grow relatively peacefully on the opposite side of the board. Byzantium, and to some extent Plum, were able to make use of their expansion to move up the Ritual track. Plum was also able to expand her Forts to several areas. Cobalt was able to upgrade his forts in the limited areas he controlled, as well as draw up to the hand limit of eight development cards over the first half of the game.
 |
| – Image by boardGOATS |
During the second half of the game, after the Cathedral was built and the Nightmares came out, Cobalt was able to make use of his Development cards (especially due to a very well timed fortunate draw) to control both Nightmares in a single turn to Convert and then Devour a sufficient number of his own Units to claim a high-scoring Dream card as well as ensure he had the most Devoured units for end-game scoring. Unfortunately, this time, the group ran out of time so had to end the game early, stopping after everyone had completed an equal number of turns (time which Byzantium used to move up the Ritual track and Plum used to built a few more Forts).
 |
| – Image by boardGOATS |
Long before the game finished, it was clear that Cobalt was miles ahead and nobody was going to catch him. Plum held on to he Dreams for too long, while Cobalt and Byzantium were better at completing theirs. She did manage to get a Fort in the fourth corner of the map fairly early on which gave her somewhere to spawn her Units from, though. Ending the game early meant players didn’t get to make as much of their Upgraded Action Cards as they might have done and there were cards left in hand which could have come into play with another few more rounds. As a taster game, it proved quite different, however, and deserving of another try sometime, as long as there is time to complete it.
 |
| – Image by boardGOATS |
Learning Outcome: You are never too old to play “Spot-the-Difference”, but that doesn’t make you good at it.
