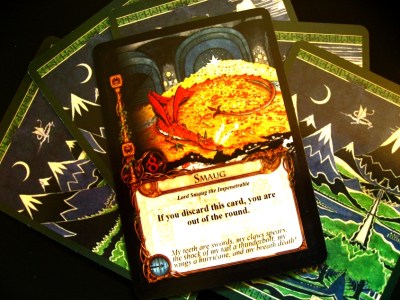
While they were waiting for people to finish their supper, Green, Grey, Red and Violet warmed up with a quick game of Love Letter. One of the first of the “micro-games” this is a tiny gem, played with just sixteen cards. Each card has a value (one to eight) and an action; players start with one card and add a second to their hand before playing one of them and enacting the action. The round goes to the player with the highest value at the end and the player who wins the most rounds wins the game. This time we were playing with a print-and-play Hobbit version, with players trying to finish with the Smaug card and winning a tiny gold ring if they do. This time, although he was dealt cards, Grey didn’t really get the chance to play as he was out before his turn each time. Red, on the other hand, took the game winning two rounds, one more than Violet.
 |
| – Image by boardGOATS |
With everyone fed we moved onto our “Feature Game”, Orléans. This is a “bag building” game set in medieval France. The idea is that each player has a bag and, at the start of the round draws workers from it. Players then place their workers on it their market which has a maximum of eight spaces, before moving as many as they want onto their personal player board which dictate the actions they can carry out. Once everyone has placed their pieces, players take it in turns to carry out their actions. There are a variety actions, but most of them involve taking another worker that is added to the bag along with any workers that have been used. Thus, the game is mechanically very simple: draw workers from a bag, plan which actions to do and then do them with points awarded at the end of the game. This simplicity belies the depth of the game and the complexity that comes as a result of combining the different actions though.
 |
| – Image used with permission of BGG contributor bkunes |
In addition to taking a worker, the most actions come with a bonus; some of these help players manage their game, while others give players scoring opportunities. For example, going to the Castle will give a player an extra “Knight”, but will also enable them to take an extra worker out of the bag on subsequent turns. Similarly, a trip to the Village to get a “Craftsman” will also yield a technology tile which can be placed in a location and stays there for the rest of the game, acting as a permanent worker. On the other hand, players who go to the Farm House will get an extra “Farmer” but also an extra resource and an extra “Boatman” comes with money. Both money and resources score points at the end of the game. Each of the Character actions has an associated track on the communal player board and the players move one step along these tracks each time they carry out an action; the bonus received on each step is marked just above the track, and in general they increase the further along the track players are.
 |
| – Image used with permission of BGG contributor jsper |
The biggest source of points, however, comes from a combination of travelling around France building Trading Stations, collecting “Citizens” and travelling along the development track. Travelling can either be carried out along rivers or roads and, if there is no-one else has already built there, they are able to place one of their ten little wooden houses in the town (all using the appropriate actions of course). Citizens can be acquired by being the first player to fulfil certain requirements (e.g. get the maximum number of Knights or Boatmen). Along the bottom of the main player board, there is also a Development Track and at intervals Coins and Citizens are available (only the first player get the Citizens though every player gets money). There are also Status Markers at intervals along the track – these are critical: at the end of the game, players score points equal to the sum of the number of Trading Stations built and Citizens acquired multiplied by the total number of Status Markers.
 |
| – Image by boardGOATS |
There are a range of ways to move along the Development Track, for example, choosing the University action comes with a Development Point bonus, and the Scriptorium and Town Hall can both also give Development Points, though perhaps less efficiently. One thing is clear though, this aspect of the game is a bit like collecting Nobles in Lancaster in that players neglect the Development track at their peril. This is particularly important as as the number of each type of worker is strictly limited, so when they are all gone, that action is no-longer available to any player. Thus, players who neglect the University action in the early part of the game may find it is no longer available when they want to use it later. One of the most important aspects of the game for players is controlling the contents of their bag as this dictates what actions they will be able to take. Since the Development Track is so important, it might be thought that a good way to start is to make repeated visits to the University. This will fill the player’s bag with Scholars, though, which might not be such a good thing unless players can find another way to use them effectively.
 |
| – Image by boardGOATS |
Scholars are not very useful for travelling or building Trading stations and can really only be used in the Scriptorium or Cloister (to get highly versatile “Monks”) in partnership with another worker, so are of limited use. This means that players need to vary the actions they take so that their bag remains balanced. Even so, probability can play tricks and players can end up with a very unrepresentative handful of workers. It takes a very courageous player to then forfeit actions in the current turn in the knowledge that the workers they need will likely come out next time enabling the player to carry out twice as many actions later. This approach will cause the player to delay their turn which can be a disadvantage though it can also give them a better chance to plan a larger more complex sequence of actions.
 |
| – Image by BGG contributor styren |
Another way a player can control what they draw from their bag is for a player to ensure their bag stays small. Players cannot just throw workers away, so once a player has a worker in their bag a player they have only two practical ways of getting rid of them. The first is to park them on an action they don’t intend to use. This works well if there is a suitable action available, but is not always possible and each action can only be occupied by one worker at a time, though it does allow players to recover them if necessary. The other option is the Town Hall action. Each player has two of these on their player board and, workers placed here are moved to the Beneficial Deeds board where they earn a one-off reward (either money or Development Points) and then remain there for the rest of the game. There are two problems with this: firstly, there are a finite number of spaces on the Beneficial Deeds board, so if they are filled up that is that and secondly, they can never be recovered.
 |
| – Image used with permission of boardgamephotos |
This last point is significant as players can change their strategy during the game and find that they need more of a particular type of worker. For example, the Village action allows players to collect a black Trader and the bonus is a free choice of a Place Tile. These are essentially extensions to player’s individual board providing them with extra possible actions, however, they also require workers of a given type. Thus, adding one of these may provide a use, for example, for all the Scholars that they had previously disposed of. As the number of workers available is strictly limited, the desired Scholars may also no longer be available rendering the additional Place Tile much less useful than initially thought. There is a get-out as the Cloister action gives “Monks” which are effectively “wild and can generally be used as a substitute for any other worker. However, these are also limited in number of course and tend to disappear early so the wise player will try to grab a few of these early to help keep their options open.
 |
| – Image used with permission of boardgamephotos |
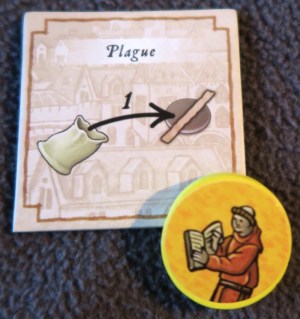
This is all very well, but it is almost certain that a well balanced bag will suffer the full consequences of the Plague. At the start of each of the eighteen rounds, an event tile is drawn at random which takes effect at the end of the round. There are six different events each of which occurs three times and they variously have good or bad consequences, including additional income, a visit from the tax man and harvest. Probably the worst of these, however, is the Plague, though the most serious effects of this can be mitigated to some degree with a bit of care and a little sacrifice. When the Plague comes, it kills one worker drawn at random from each player’s bag, but if they draw one of their key starting workers it survives. Thus the smart player will try to ensure their most precious pieces don’t go back into their bag during a Plague round, while stuffing it full of their starting workers and hoping probability does the right thing.
 |
| – Image by boardGOATS |
With seven players, we had to play two games, and they could both be the same since we had two copies of Orléans available (one the original Anglo-German version enhanced with fancy pieces and the other the Deluxe US version with different fancy pieces). Green was the least keen to play Orléans as he had played it several times recently, but as everyone else seemed keen he graciously joined in with Grey, Red and Blue to make up the first group. Blue had only played the game as a two player game and Grey and Red were completely new, so the game started fairly slowly, but Green showed the way by getting himself an early Knight and using it to go travelling, building Trading Stations as he went. In contrast, Blue and Red began by taking Craftsmen and using the associated Technologies. These are effectively permanent workers once placed on the board, which can make them very powerful if gained early enough. Grey began by taking the University action and progressing along the Development Track and being the first he managed to pick up a few early Citizens.
 |
| – Image by boardGOATS |
Red then moved onto collecting Farmers – not only do these give resources (worth points at the end of the game), but the person who gets ahead in this gets an extra coin at the start of the round (and if someone gets left behind, they lose a coin). It was about this point that we suddenly ran out of Scholars leaving everyone a long way from where they wanted to be on the Development Track and starting a rules debate as to whether players could continue to take the action for the bonus without getting a worker. This was a situation that hadn’t arisen in Blue’s two-player games and wasn’t helped by the fact that Burgundy (on the next table) had the first edition of the rules and Blue had the second. It turned out that Blue had got confused by a rules clarification by the author which explains that although players can’t perform actions that give a worker if they have reached the end of the track or there are no workers left; resources and Technologies on the other hand are a bonus and the actions are still possible if they run out. This left everyone a little bit stuck, but since Green was the only one who could have really seen it coming and was the most affected having neglected the Development Track for travelling and building Trading Stations, everyone carried on.
 |
| – Image by boardGOATS |
Blue tried to mitigate the problem by taking the Library extension tile which she could use to get two Development Points each time she used it. Similarly, Grey took the Apothecary extension which enabled him to buy Development Points up to a maximum of three per turn. By this time we had also run out of Craftsmen, so Blue picked up the Library extension which gave her extra access to the Technologies, though unfortunately for her this was a bit of a waste as it was too late in the game to really make use of it and she ended up only getting the one Technology from it. As the game progressed into the final stages, everyone suddenly seemed to discover the advantage of the extensions, so Red took the School (so that she could use Scholars as other workers); Grey took the Sacristy (to protect him from the negative effects of events), and Green took the Gunpowder Tower (which expands the market by two and can also be used to place extra workers on the Beneficial Deeds board). Green was probably the most effective as he was able to use it to pick up extra Development Points and make up for a lot of his shortfall. In the last turn Blue managed to get her final Sailor and with it an extra Citizen; this proved very effective as it gave her lots of extra points as well as a lot of money and made the game much closer than it would otherwise have been. It wasn’t quite enough however, and Green won by just four points.
 |
| – Image by boardGOATS |
On the next table, Burgundy, Pine and Violet were engaged in a three player game of Orléans. Only Burgundy had played it before and he took great pains to explain it very carefully and try to help everyone avoid some of the most gruesome pit-falls early on. Pine started off like Green, by travelling and building Trading Stations until Burgundy pointed out that he had been neglecting the Development Track. Meanwhile, Violet shot up the farming track, picking up lots of resources and the extra coin at the start of each round as an added bonus. Once she had got the maximum number of Farmers, Violet moved onto travelling and collected even more resources, and building the occasional Trading Station when she could. While all this was going on, Burgundy concentrated on collecting Citizens and building a quality bag. Pine tried stuffing his bag with monks, but they seemed very shy and didn’t seem to want to come out to play when he needed them. Everyone took an expansion tile: Burgundy took the Wool Manufacturer early in the game and, as a result and ended up with piles of the stuff, while Violet (like Red on the next table) took the School which enabled her to use Scholars in place of other workers, something she used a lot.
 |
| – Image by boardGOATS |
Pine took the controversial Bathhouse expansion tile which has been the subject of two rules re-writes. In the first edition of the rules, the player had to place one Farmer on the tile to activate it and then, when it was chosen as an action, the player draws three workers from the bag and chooses two of them to place on appropriate actions which can be used straight away if appropriate. When the game was first released some players seemed to find this overly powerful, so the designer suggested a modification to the rules such that only two tiles are drawn and only one is kept. When TMG brought out their edition, they altered the rules again. In this third version, it is not necessary to place a Farmer to activate the tile, but the additional two workers are drawn from the bag after the others and one is returned, but for this to be useful, there must be sufficient space in the player’s market to hold the extra worker. Each of these has advantages and disadvantages with the requirement for a Farmer to activate it being used to give an extra worker during the round allowing players to leave planning till later in the game and potentially enabling them to use an action twice. In this game, however, we played by the rules as originally written.
 |
| – Image by boardGOATS |
As the game progressed, everyone struggled a bit on the Development Track and everyone was pretty much dead level. Burgundy (like Blue on the next table) decided to make a move on the oft-neglected Sailors. Since the bonus isn’t immediately useful, players tend not to bother about them, however, they provide a lot of money (a total of fourteen for a player who gets everything available) and money equals points at the end of the game. There is also a Citizen for the player who gets the maximum first, so getting ahead can be quite lucrative, especially as there is often no real competition for it. Meanwhile, Burgundy was struggling with the Beneficial Deeds board. He was after the citizens, but as the only one using it, he was struggling and ended up with fewer of some workers than he really wanted. Eventually Pine and Red gave him a hand, but it was all a bit late in the game for Burgundy. That said, he had a huge pile of money and finished nearly thirty points ahead of Pine who just sneaked into second place.
 |
| – Image used with permission of BGG contributor punkin312 |
Despite the fact that the two games had different numbers of player, they finished at much the same time, with the four-player game actually beginning scoring first. Even though the number of resources and workers are adjusted the game plays very differently with different numbers: with fewer players there is more space to move around France and there is a lot less to take on-board. Red in particular found it very difficult to absorb all the information and options available in the four-player game so perhaps it is easier to grasp what is going on as a two or three player game the first time. We all struggled to get the workers we wanted at key times. Monks (especially Pines) appeared to hide in a closet reading their scriptures for most of the game. Until there was a plague that is, at which time they all came out to find out what all the screaming was for, at which point they were immediately struck down. That said, Orléans is a great game with a good balance of frustration and a remarkable amount of depth for what are otherwise very simple rules. Perhaps the biggest issue is the number of tiny rules exceptions (e.g. the first Technology must replace a Farmer), which complicate teaching a bit, but that’s a small criticism in what is otherwise an unusual worker placement game.
 |
| – Image used with permission of BGG contributor henk.rolleman |
Red, Green, Grey and Violet all headed off, leaving Burgundy, Blue and Pine with some three-quarters of an hour to play something. After a short chat about the future of the “Feature Game”, and how we choose what to play, the group settled down to a quick game of Splendor. We’ve played this little chip-collecting and card development “engine building” game quite a bit, but we all still seem to quite like it when we are looking for a light filler game. The idea is that players collect chips to buy gem cards which can, in turn, be used in lieu of chips. More expensive cards are also worth points and the game end is triggered when one player reaches fifteen points (and the round is completed to give everyone the same number of turns). Points are also awarded for “nobles” which go to the first player to get a specific combination of gem cards and the player with the most points at the end is the winner.
 |
| – Image used with permission of BGG contributor henk.rolleman |
This time, Blue started really well, and before long was eight points clear of everyone else. Burgundy couldn’t get what he wanted at the start, so just picked up lots of ruby cards while Pine found that everyone else nicked the cards he was after just before he could get to them. Maybe it was because Blue relaxed, or maybe it was because she and Pine took their eye off the ball, but suddenly, the cards seemed to fall right for Burgundy and Blue and Pine let him take what he wanted. Before long, Burgundy had picked up two nobles in very quick succession and needed only one point to end the game (as the last player in the round). Blue managed to pick up two points but it wasn’t enough and Burgundy pipped her to the final win of the evening by just one point.
 |
| – Image used with permission of BGG contributor henk.rolleman |
Learning Outcome: Tight games are some of the most interesting.

Pingback: 4th October 2016 | boardGOATS
Pingback: 1st Movember 2016 | boardGOATS